


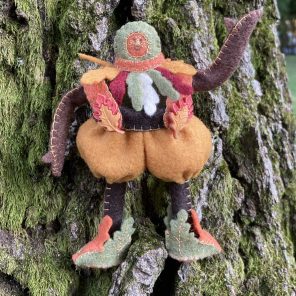
If I had to choose a favorite costume element, it would be puffy sleeves and pant legs. They are simple, but so fun. I’m still figuring out how best to make them for my dolls. In this post, I’m going to show a method that was pretty successful, which I hope can be helpful for your own projects!
The most common way of making puffed sleeves or pants is to make them large then gather at the end. I did succeed with this method for my Woodsman’s pants last year, making very wide legs and then pulling them close around his legs with thread.
However, this method can be difficult for my designs. My dolls are small, and made mostly of thicker felt. What’s more, I like to mix colors and patterns in pieces: for the Woodsman’s pants to work, I had to use just one color of felt. All these things tend to mess up the shape when you try to gather the pants into the desired shape.
So, I tried to work the shape into the pattern instead. It takes me a while to figure out the geometry of patterns, and I couldn’t find any ready-made felt pants patterns for tiny dolls… The closest thing I could think of with the shape I wanted was a tomato pincushion. I browsed through Rhonda Dort’s delightful blogpost on tomatoes to get some tips.

The pattern for the pincushions uses “football-shaped” pieces of fabric (I would call them almonds, but that shows how much I like sports). Since pant legs need to be open rather than full globes, I made almonds with wider and flatter ends instead of points.
For these pants, I wanted a pattern of orange and black stripes. I also thought each leg should be twice as wide in its middle as on its ends (though after putting them together, I think I could have used a more dramatic change!). After measuring my doll, I figured six panels for each leg (three of each color): each measures about one-quarter inch wide on the ends, curving out to reach one-half inch wide in the middle.
Next, backstitch the panels together in pairs. I sewed five of my six pattern pieces together in this way, alternating colors.

The sixth piece, which completes the circle of the pant-leg, is a bit different.

This is where the two legs will meet in the middle, so we need room for the doll’s body. So, I cut this panel to about half the length of the others.
Repeat for the second leg, sew them together, and they’re pants! My signature move is always forgetting which is the right side and which is the wrong side when sewing pant legs together… but after a false start everything worked out.

Now, I wanted to make the pants a bit fancier with a waistband. The waistband also adds some thickness and a drawstring to help the pants fit better on the top (essential considerations for anyone who, like me, has a “fast and loose” approach to measurements).
I cut a green rectangle to become the waistband. Its length is the measurement of my doll’s waist. Its width is about twice what I wanted to waistband width to be, because it is folded down in half, with both ends attached to the pants. I used lots of pins to make sure the pants gathered in the correct way to fit this length.
First, I sewed the bottom or inside of the waistband to the pants. These are messy stitches, but it doesn’t matter because they are hidden when the waistband is folded down. The main idea is to make sure it’s firmly attached.

Note: there’s no good reason why I did the first line of stitches with the pants inside out. It could go either way.
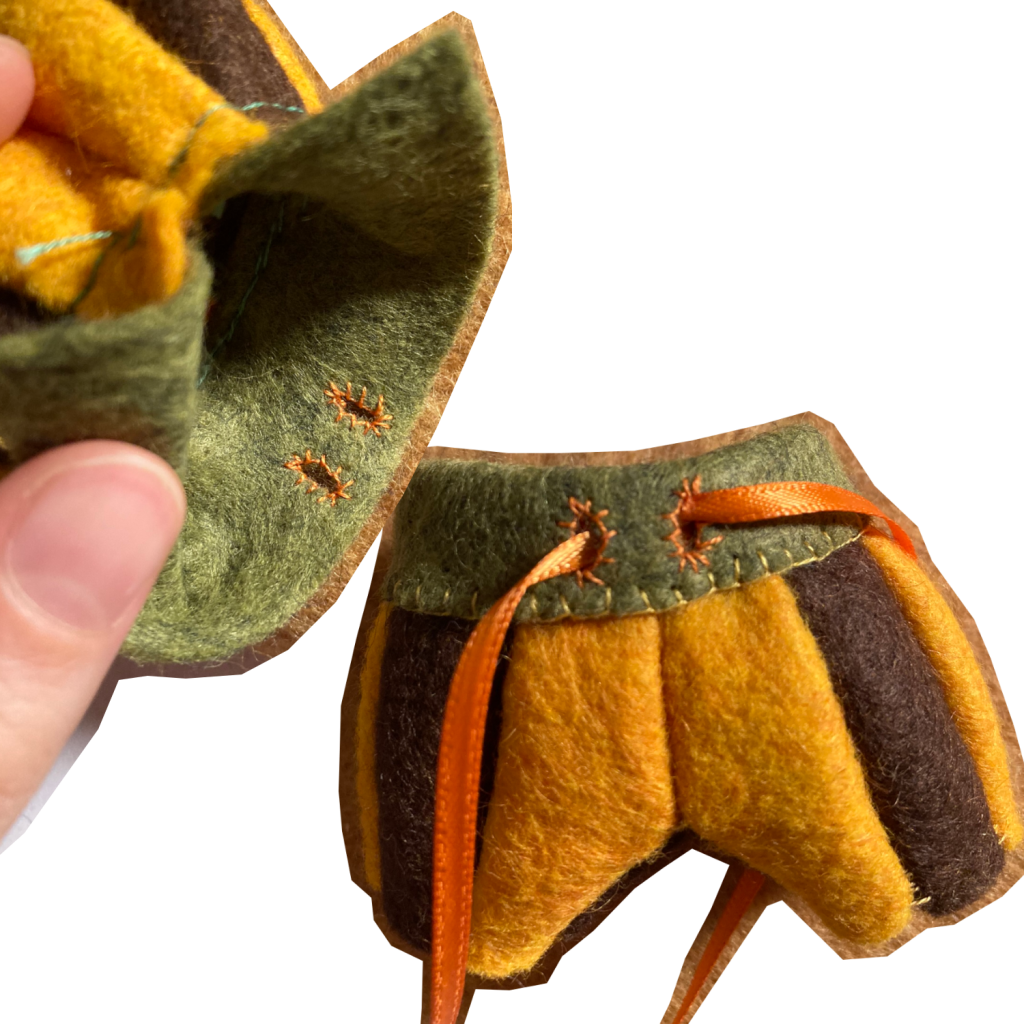
Once I had the waistband in place, I cut two holes in the front center where I wanted the drawstring ribbon to come out. I stitched around the edge of each hold in orange thread, as I would for a button-hole.
I pulled the ribbon through and arranged it in place before folding the waistband down and securing it to the outside of the pants with blanket stitch. (Much easier than pulling it through after the fact!)
That finishes the pants! This guy will have many more components to his outfit, so stay tuned for more posts.

One response to “Let’s Make Puffed Pants!”
Delightful!